Fresh peaches combined with this perfect gluten-free pie crust make this homemade gluten-free peach pie absolutely delicious! Being gluten-free and dairy-free does not mean we have to give up the wonderful world of pies!

Want to save this recipe?
Growing up, I lived next door to my grandmother, and she frequently made pies to serve any family members stopping by for a visit. I’ve always associated pies with her and the way she showed love and hospitality to her family. So, let’s make some pie and spread some love!
Jump to:
How to Make Gluten-Free Peach Pie
Make 2 pie crusts. Arrange the bottom crust into the pie pan.
Mix peaches, sugar, cornstarch, lemon juice, and cinnamon together and pour this into the prepared pie crust.
Place the second pie crust on top and seal the edges together. Cut a few small slices in the top crust to let steam escape while baking, or cut strips with the second pie crust to make a lattice design like in the pictures below.
How to Make Gluten-Free Pie Crust
This pie crust is very easy to make. I do use a food processor, and that makes it come together very fast. If you don’t have a food processor, use two forks or a pastry cutter to cut in the frozen buttery spread. If you can have dairy, then go ahead and use regular butter in this recipe.

To make this pie dough start by taking 1/2 cup of buttery spread (Smart Balance or Earth Balance) and spread it out in small chunks on a freezer-safe plate. Put the plate with the buttery spread on it and place it in the freezer for at least 30 minutes.
In a food processor put in the gluten-free flour mix, frozen buttery spread chunks, and salt and pulse until crumbly. Add in one tablespoon of ice water and pulse. Add one more tablespoon of ice water and pulse until it forms into a ball.
Rolling Out Gluten-Free Pie Dough
Take the ball of pie dough and any stray pieces of dough and place them on a piece of parchment paper. Pat out into a round patty.

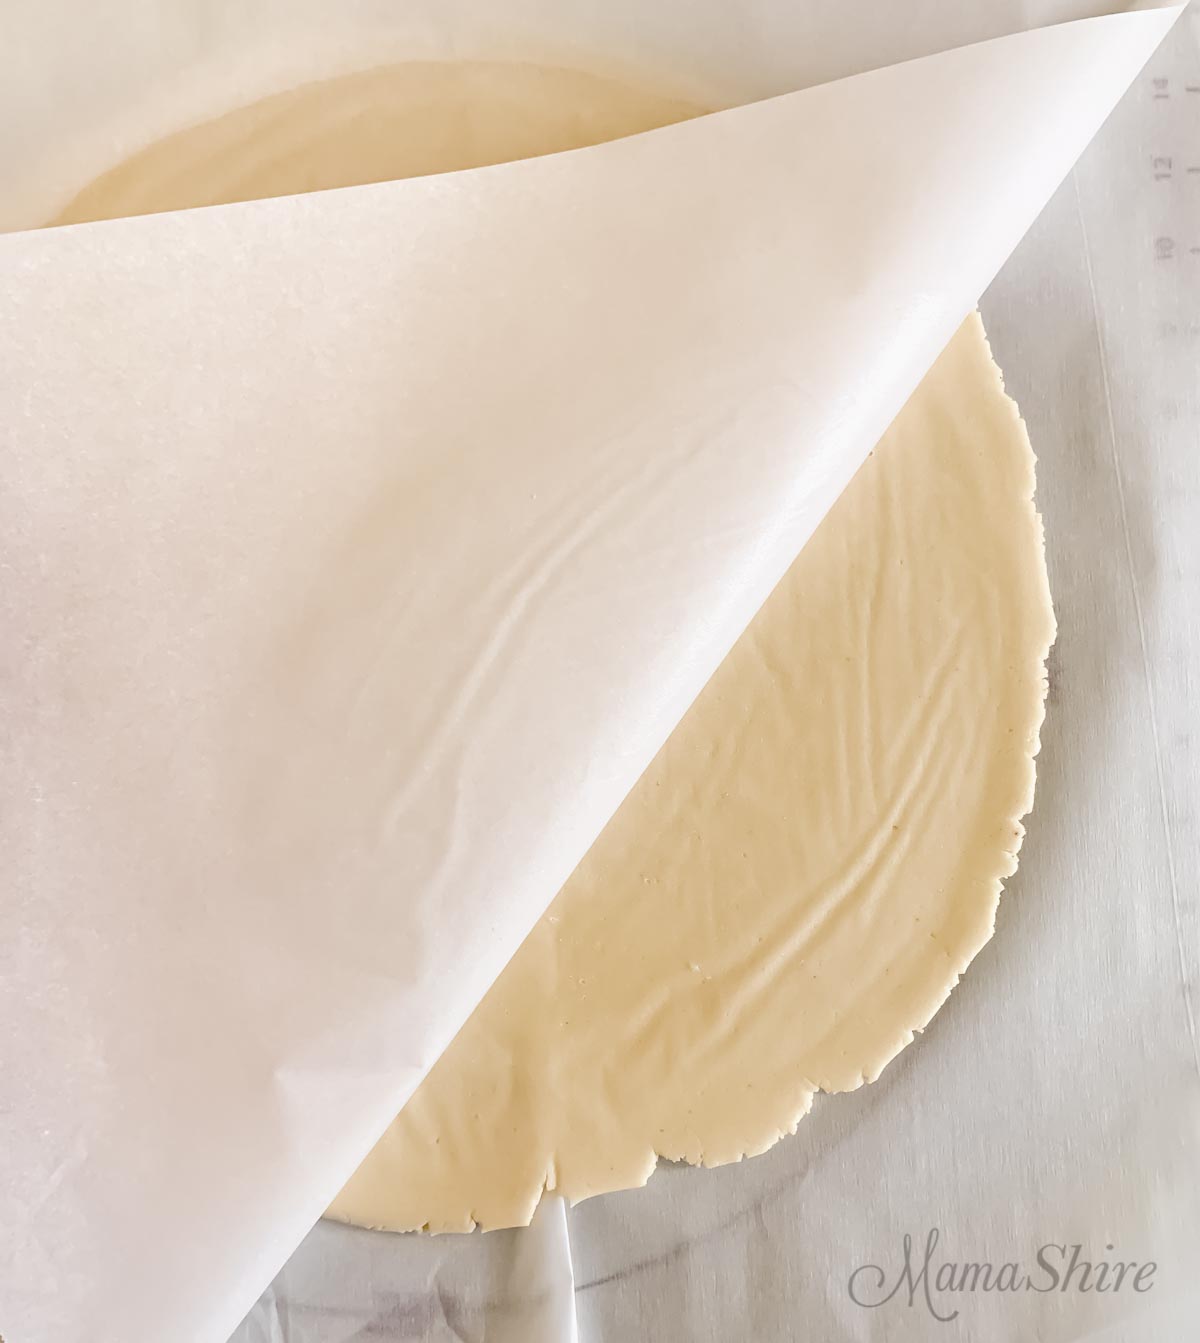
Place the second piece of parchment paper over the pie dough and using a rolling pin roll out to the size you need. I have a pastry mat that shows the measurements of the pie pan so that it’s easy to know how big to roll it. If you don’t have something like that simply turn your pie pan over on top to see how big you need it to be. You’ll want it a little larger than your pie pan. And even though I use a pastry mat I still put parchment paper down. Gluten-free pie dough is a bit stickier and more fragile than regular pie dough.
Placing the Pie Crust into the Pie Pan:
Carefully pull off the top parchment paper and then holding the bottom layer of parchment paper turn your pie crust over onto your pie pan and then slowly let it form to the inside of your pie pan. Remove the parchment paper slowly. You may need to tear it in strips to get it off. Repair any tears that might happen by pushing the dough together with your fingers and then gently smooth out.
Leave a nice amount of dough around the top edge of the pie pan but cut off any excess that is just hanging off. Save any pieces that you cut in case you need to use it to repair any areas.
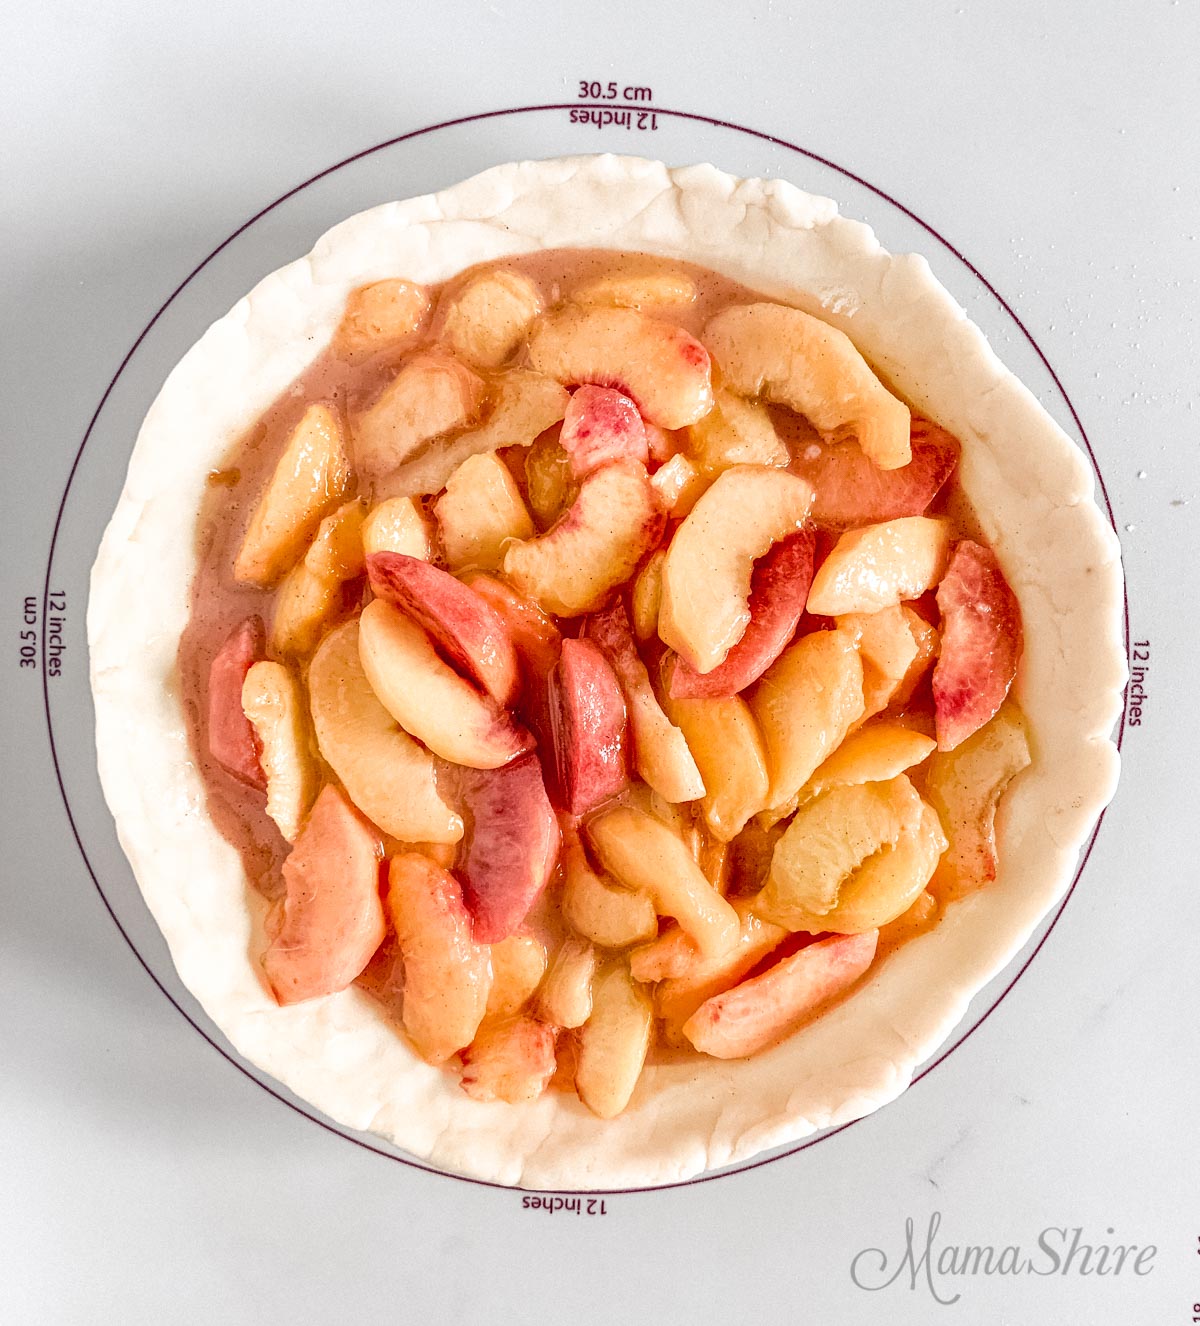
Place the peach mixture in the pie crust evenly.
Make the second pie crust. Roll out the second pie crust the same as before. Place this with the parchment paper on a flat cookie sheet that will fit in your refrigerator. Put this in the refrigerator for 30 minutes.
When you are ready for the second pie dough remove it from the refrigerator. If you want to have a solid pie crust on top go ahead and place it on the pie and seal. Cut a few slits in the top to let the steam escape.
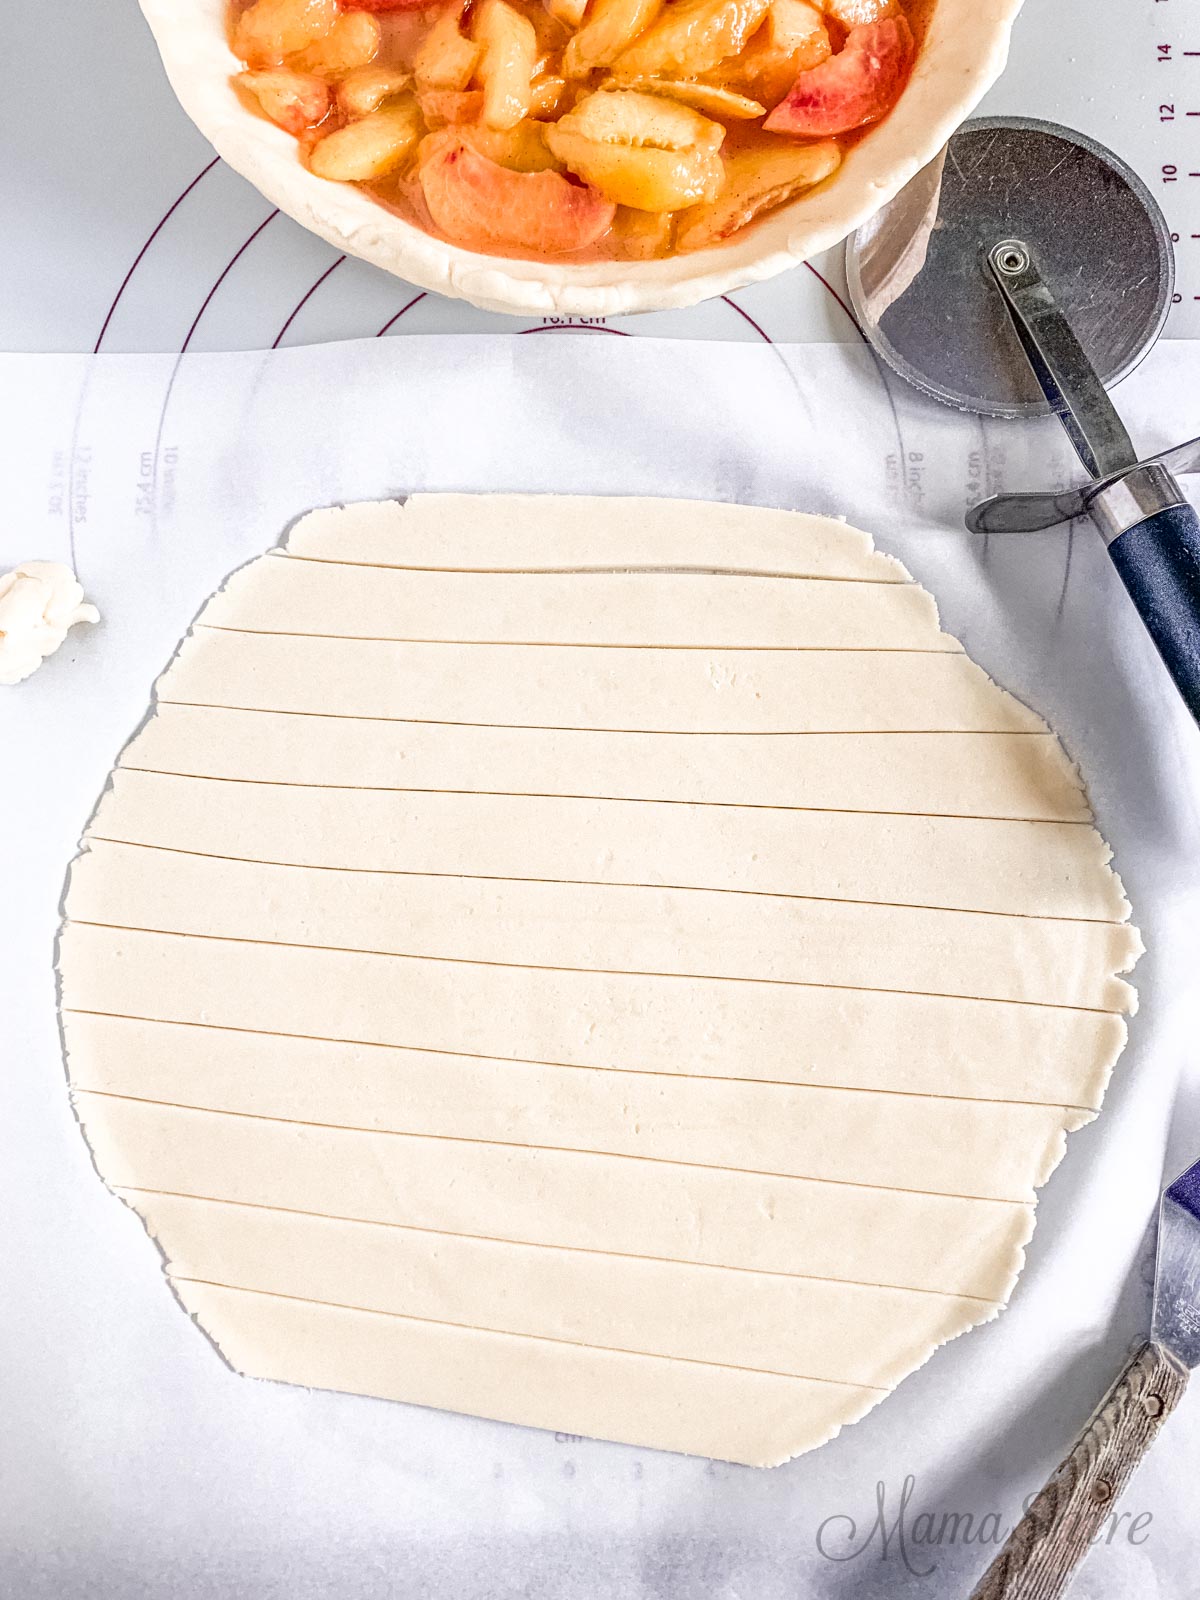
Making a Lattice Design
If you want to do a lattice design cut the dough into strips. I used a pizza cutter but if you have one of those darling pinked pastry cutters use one of those for extra beauty!

Place the strips across the pie like a basket weave. Some strips may break, but the dough is very easy to pinch back together. Seal the edges of the pie crust and decorate the edge using your fingers or use a fork to pinch together.
Baking the Pie:
Brush a beaten egg white over the crust and sprinkle with sugar. Bake at 450° for 10 minutes and then reduce the heat to 350° and bake for 40-45 more minutes.

Let it cool for a couple of hours to set up. But if you want it warm, go ahead and cut into it after about 30 minutes or so.

Ingredient notes
Gluten-Free Flour: My favorite gluten-free & dairy-free flour blends to use are Better Batter and Pamela’s Artisan Blend. I’ve been using them both with excellent results. They are both one-to-one substitutes. If you use a different gluten-free flour blend, be sure it contains xanthan gum. If not, add 1/2 teaspoon of xanthan gum per cup of flour.
Dairy-Free Butter: Suggested brands include Country Crock Plant-Based with Avocado Oil, Smart Balance, or Earth Balance.
More gluten-free peach recipes you’ll love


Gluten-Free Peach Pie Recipe (Dairy-Free)
- Prep Time: 1 hour 20 minutes
- Cook Time: 1 hour
- Total Time: 2 hours 20 minutes
- Yield: 8 servings 1x
- Category: Dessert
- Method: Oven
- Diet: Gluten Free
Description
Homemade gluten-free peach pie that starts with an easy-to-make dairy-free pie crust and is then filled with juicy, sweet peaches.
Ingredients
Pie Crust: These amounts are for one pie crust, but you will do this twice, as you’ll make each pie dough separately.
1 ¼ cup gluten-free flour mix *
½ cup dairy-free butter **
½ teaspoon salt
2 tablespoons ice water
Peach Pie:
10 medium-sized peaches***, peeled and sliced (around 5 cups)
⅔ cup sugar
4 tablespoons cornstarch
1 tablespoon lemon juice
¼ teaspoon cinnamon
For topping the pie crust:
1 egg white, beaten
1 tablespoon sugar
Instructions
Make 2 pie crusts from the directions below.
Mix peaches, sugar, cornstarch, lemon juice, and cinnamon together and pour this into the prepared pie crust.
Follow directions below for top pie crust and baking.
Pie Crusts: (these directions look long but are actually very easy)
Start by taking 1/2 cup of dairy-free butter and spreading it out in small chunks on a freezer-safe plate. Put it in the freezer for at least 30 minutes.
After 30 minutes, put the gluten-free flour, frozen dairy-free butter chunks, and salt in a food processor and pulse until crumbly. Add in one tablespoon of ice water and pulse. Add one more tablespoon of ice water and pulse until it forms into a ball. If not using a food processor, mix in a bowl with a pastry cutter or two forks.
Rolling Out The Pie Dough:
Take the ball of pie dough and any stray pieces of dough and place them on a piece of parchment paper. Pat out into a round patty.
Place a second piece of parchment paper over the pie dough and, using a rolling pin, roll out to the size you need. I have a plastic mat that shows the size of the pie pan so that it’s easy to know how big to roll it. If you don’t have something like that, simply turn your pie pan over on top to see how big you need it to be. You’ll want it a little larger than your pie pan.
Placing the Pie Crust into the Pie Pan:
Carefully pull off the top parchment paper, and then holding the bottom layer of parchment paper turn your pie crust over onto your pie pan ,and then slowly let it form to the inside of your pie pan. Remove the parchment paper slowly. You may need to tear it into strips to get it off. Repair any tears that might happen by pushing the dough together with your fingers and then gently smoothing it out.
Leave a nice amount of dough around the top edge of the pie pan, but cut off any excess that is just hanging off. Save any pieces that you cut off in case you need to use them to repair any areas.
Put the pie crust in the refrigerator to chill for 30 minutes.
Make the second pie crust.
Roll out the second pie crust the same as before. Place this with the parchment paper on a flat cookie sheet that will fit in your refrigerator. Put this in the refrigerator for 30 minutes.
Putting the Pie Together:
After 30 minutes, preheat your oven to 450°.
Remove the pie pan from the refrigerator and place the peach mixture evenly in the pie crust.
Remove the second pie dough from the refrigerator. If you want the top crust to be whole ahead and place it on the pie and seal. Cut a few slits in the top to let the steam escape.
Brush a beaten egg white over the crust and sprinkle with sugar.
Making a Lattice Top Design:
If you want to do a lattice design, cut the dough into strips. I use a pizza cutter, but if you have one of those darling pinked pastry cutters use one of those for extra beauty!
Place the strips across the pie like a basket weave. Some strips may break, but the dough is very easy to pinch back together. Seal the edges of the pie crust and decorate the edge using your fingers or use a fork to pinch together.
Brush a beaten egg white over the crust and sprinkle with sugar.
Baking Instructions:
Bake the pie at 450° on the lowest rack for 10 minutes. Reduce the temperature to 350° and bake for 40-45 more minutes.
Tip: While it’s baking, check on it a few times to make sure your top crust isn’t burning. You may need to rotate your pie in the oven if you have areas that bake hotter.
Let it cool for a couple of hours to set up. But if you want it warm, go ahead and cut into it after about 30 minutes.
Once it’s cooled, it can be stored covered on your counter. After a day or two, store any remaining pie in the refrigerator.
Notes
*Gluten-Free Flour: My favorite gluten-free & dairy-free flour blends to use are Better Batter and Pamela’s Artisan Blend. I’ve been using them both with excellent results. They are both one-to-one substitutes. If you use a different gluten-free flour blend, be sure it contains xanthan gum. If not, add 1/2 teaspoon of xanthan gum per cup of flour.
**Dairy-Free Butter: Suggested brands include Country Crock Plant-Based with Avocado Oil, Smart Balance, or Earth Balance.
***Peaches: Frozen or canned peaches can be used in this recipe. Be sure to thaw and drain.

Allison
Hey, I LOVE this recipe (and the fact that I can enjoy pie again, even though I have a gluten sensitivity)! I think you forgot to include the egg in the instructions? I assume it goes into the food processor, but I’m not sure if it’s before or after the ice water? Thanks!
MamaShire
I’m so glad you love this recipe! Thanks for letting me know about the egg. It actually goes on top of the pie crust before baking. I updated the recipe to be more clear. I’ll be posting more pie recipes soon!
Betty
Thanks for the recipe. It’s so good!
Jeanie
Peaches are now out of season and I have a request for a peach pie for Christmas.Can I use canned peaches or what do you recommend. Thanks heaps.
Jeanie
Jeanie
Oh sorry no need to respond to my post. HA HA! I saw that I can use canned or frozen peaches. Thanks tons!
Ang
So delicious and the crust was light and flakey!! This was the first pie I’ve ever baked and it was so easy to do with this recipe! The only thing I might change is adding a bit of sugar to the crust… I like things sweet 😉
MamaShire
I’m so glad you enjoyed it!