This gluten-free pie crust recipe is easy to make and roll out. It turns out so tasty and flaky. This makes the perfect crust for dessert pies and savory pies like my Gluten-Free Chicken Pot Pie.

Want to save this recipe?
This recipe does need extra prep time, but that is mostly setting things in your freezer or refrigerator to chill. And it takes only 4 ingredients to make. I include instructions for using a food processor or a pastry cutter.
Jump to:
Instructions
To make this pie dough, start by taking 1/2 cup of dairy-free butter and spreading it out in small chunks on a freezer-safe plate. Then, place in the freezer for 30 minutes.
Food Processor: After 30 minutes, put the gluten-free flour, frozen dairy-free butter, and salt in a food processor and pulse until crumbly. Mix in one tablespoon of ice water (only the water) and pulse. Add one more tablespoon of ice water and pulse until it forms into a ball.
Pastry Cutter: If you don’t have a food processor, use two forks or a pastry cutter to cut in the buttery spread into the flour and salt. Cut in until crumbly. Mix in one tablespoon of ice water and mix; add a second tablespoon of ice water and mix until it forms a ball.

Rolling out the dough
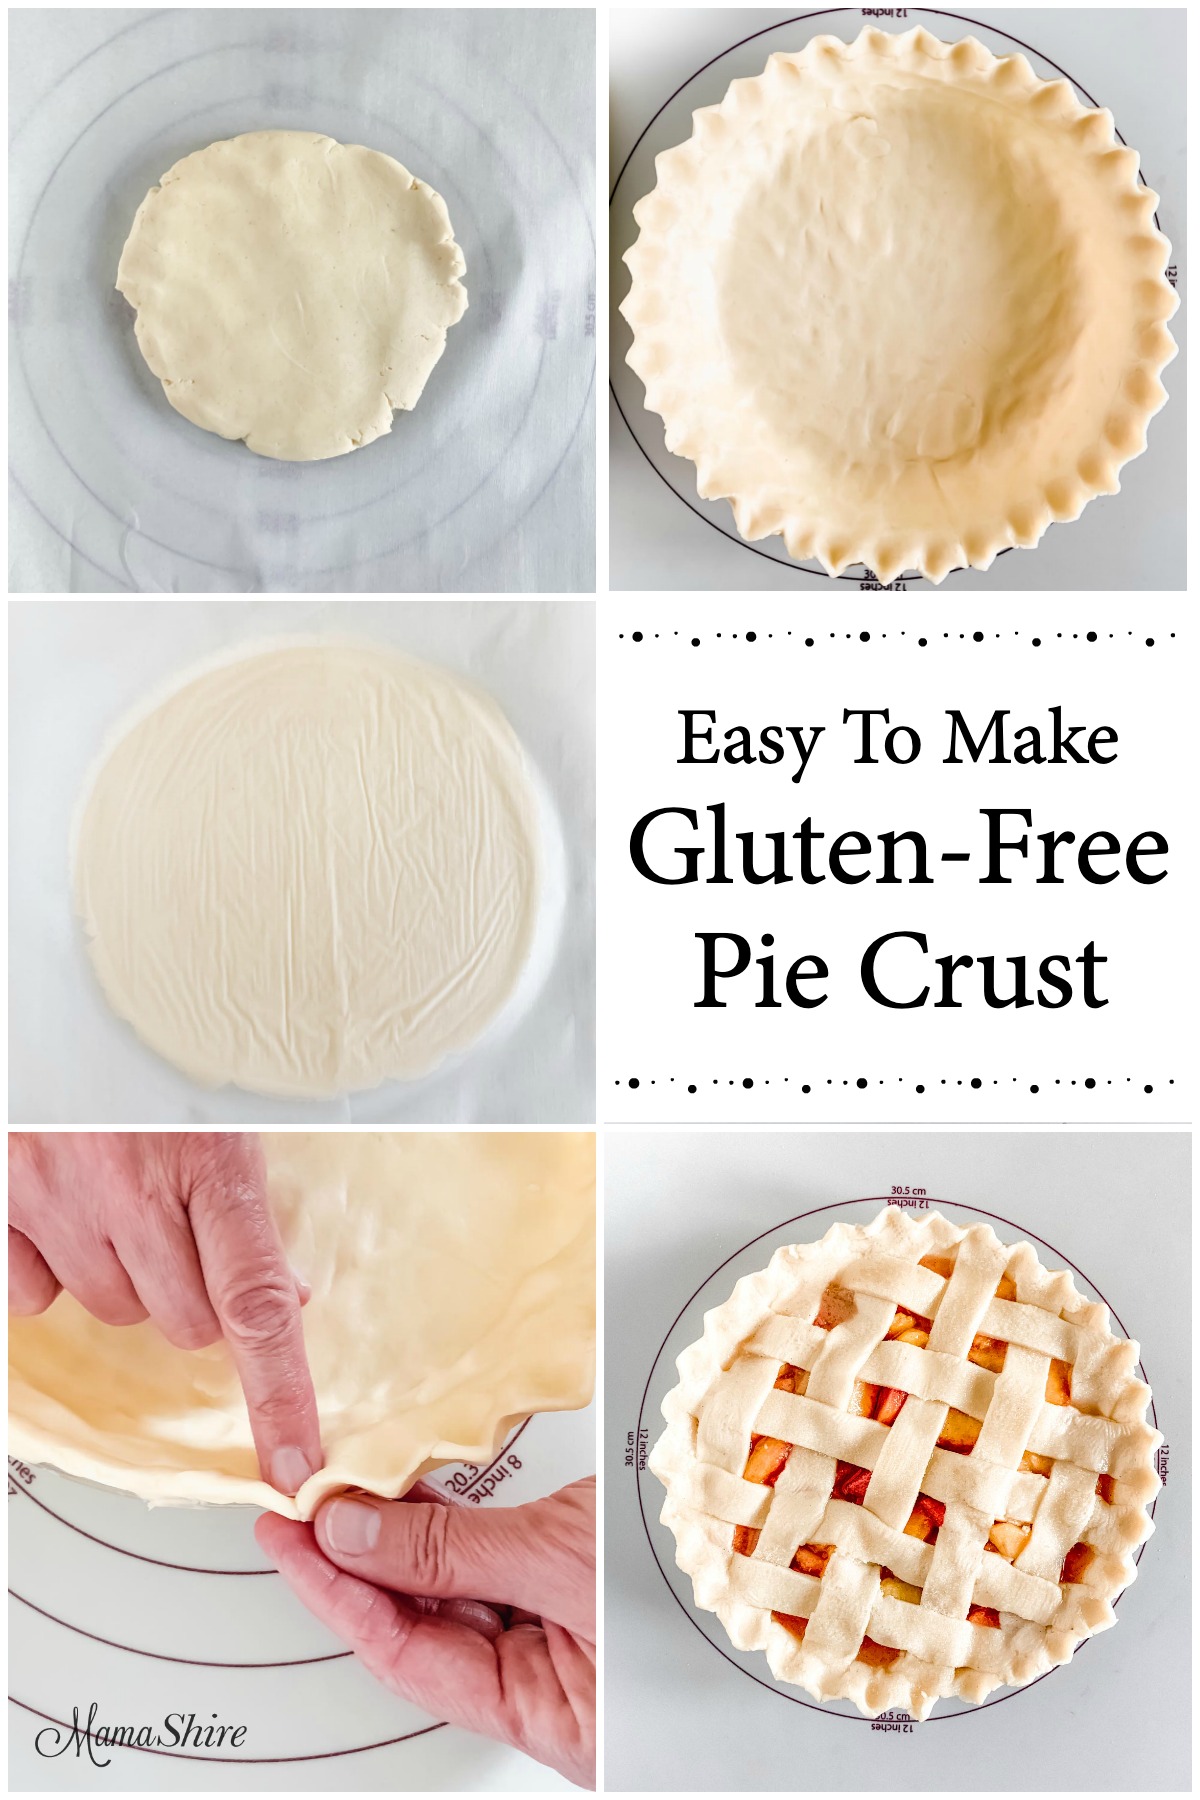
Take the ball of pie dough and any stray pieces of dough and place them on a piece of parchment paper. Shape it into a round patty.

Place another piece of parchment paper over the pie dough and use a rolling pin to roll out the pie crust to the size you need. Roll away from the center in different directions to evenly spread it out into a circle.
Turn the whole pie dough with both parchment papers over several times while rolling out. I have a pastry mat that shows the measurements of the pie pan so that it’s easy to know how big to roll it. If you don’t have something like that, turn your pie pan over on top to see how big you need it to be. You’ll want it a little larger than your pie pan.
And even though I use a pastry mat, I still put parchment paper down. Gluten-free pie dough is a bit stickier and more fragile than regular pie dough. Another great thing about the pastry mat is that it keeps the parchment paper from slipping, so it makes it easier to roll the dough out.
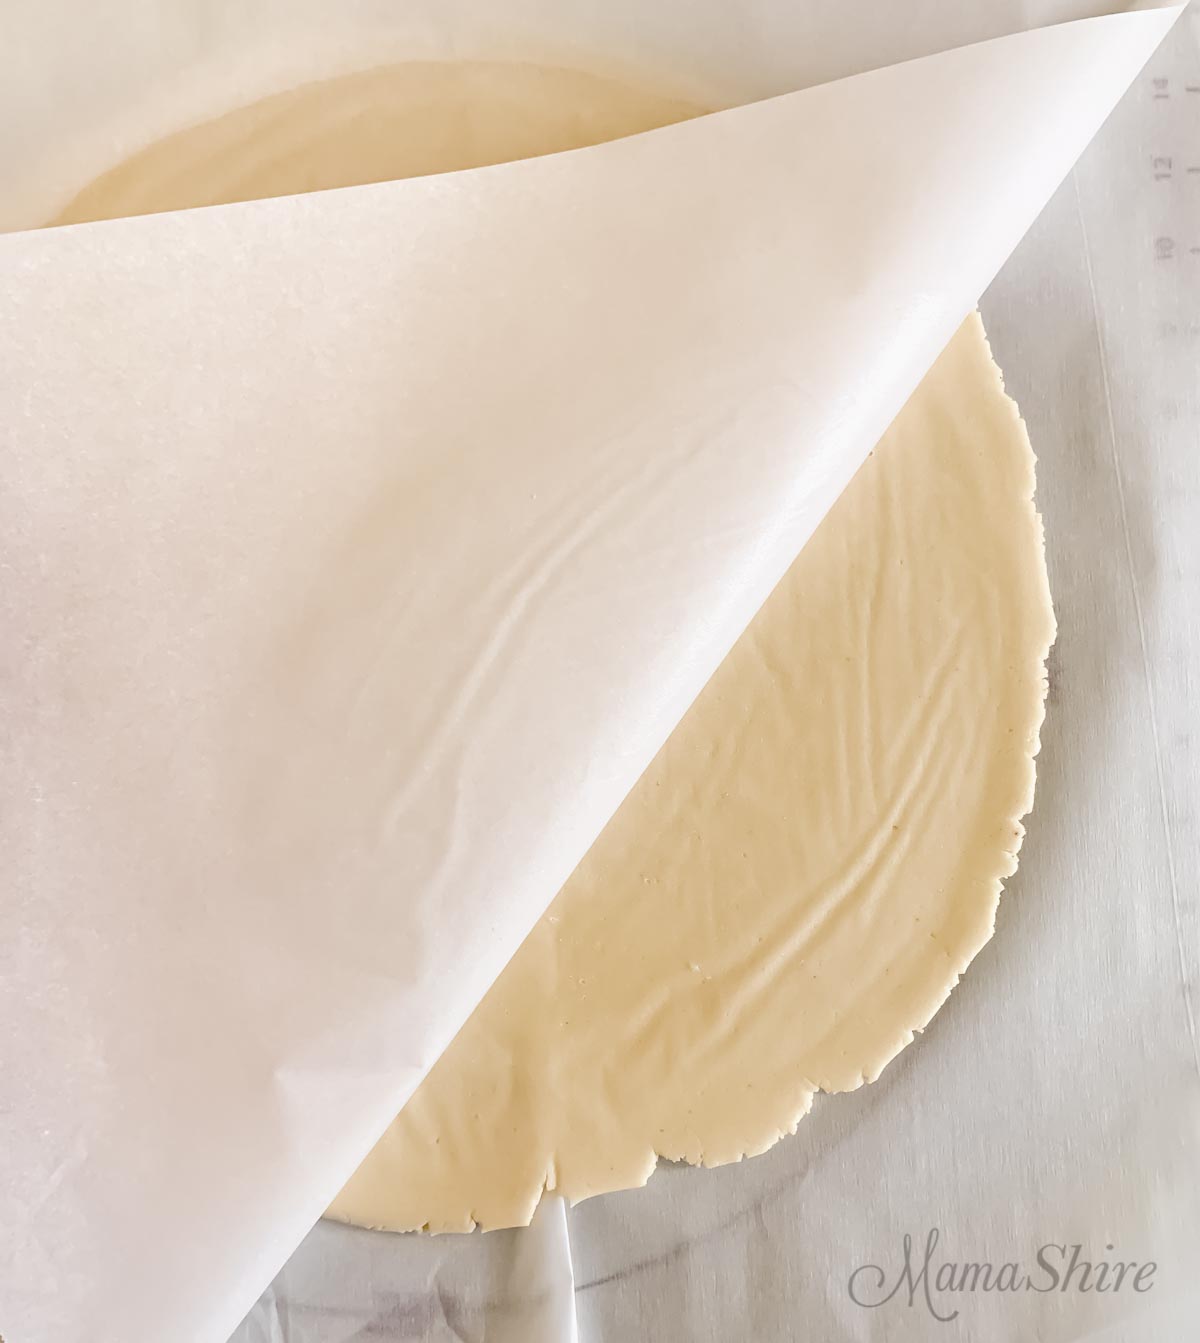
Carefully pull off the top parchment paper, and then, holding the bottom layer of parchment paper, turn your pie crust over onto your pie pan and then slowly let it form to the inside of your pie pan.
Remove the parchment paper slowly. You may need to tear it in strips to get it off. Repair any tears that might happen by pushing the dough together with your fingers and then gently smooth out.

Shaping the pie crust
Trim the dough around the top edge of the pie pan to about a 1/2″ past the rim. Save any pieces that you trim off in case you need to repair any areas. Use your fingers to press a decorative design around the edge of the crust, or use a fork to press a design along the edge.
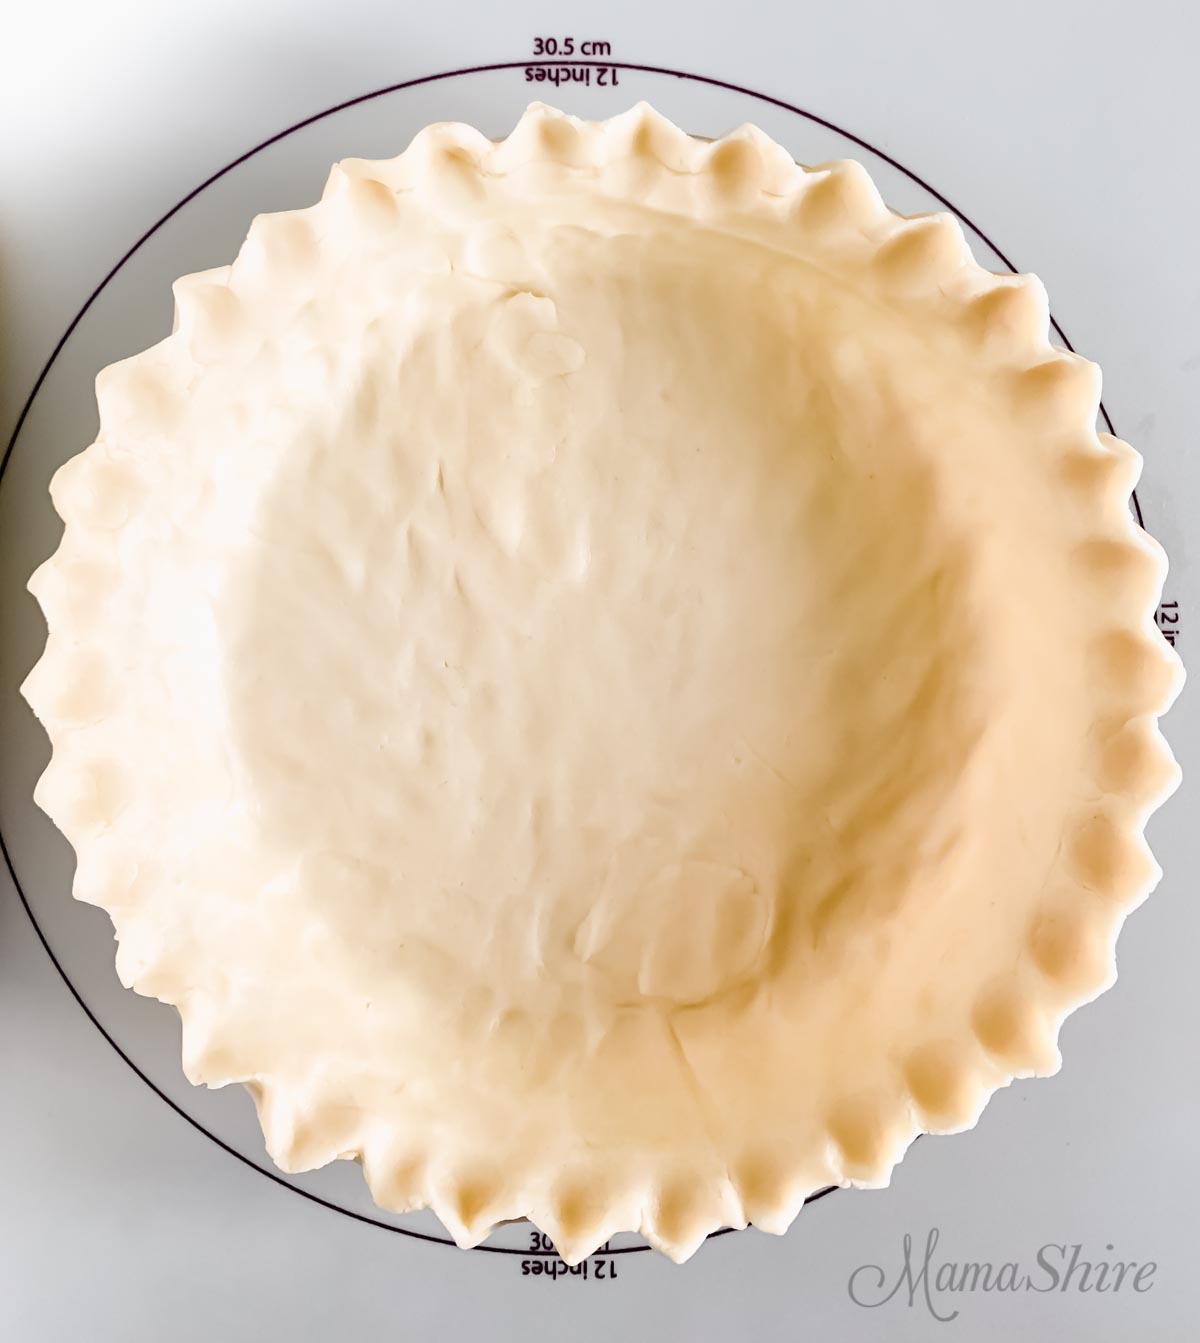
Now that you have it in the pie pan and the edge has been decorated, put it in the refrigerator for 30 minutes to chill. After it’s chilled, take it out, fill it with your pie filling, and bake it according to directions. I find that it bakes best on one of the lower racks.
Make the top crust
Make the second pie crust. Roll out the second pie crust the same as before. Place this with the parchment paper on a flat cookie sheet that will fit in your refrigerator. Chill in the refrigerator for 30 minutes.
After the top pie dough has chilled, remove it from the refrigerator. If you want to have a solid pie crust on top, go ahead, place it on the pie, and seal it. Cut a few slits in the top to let the steam escape.
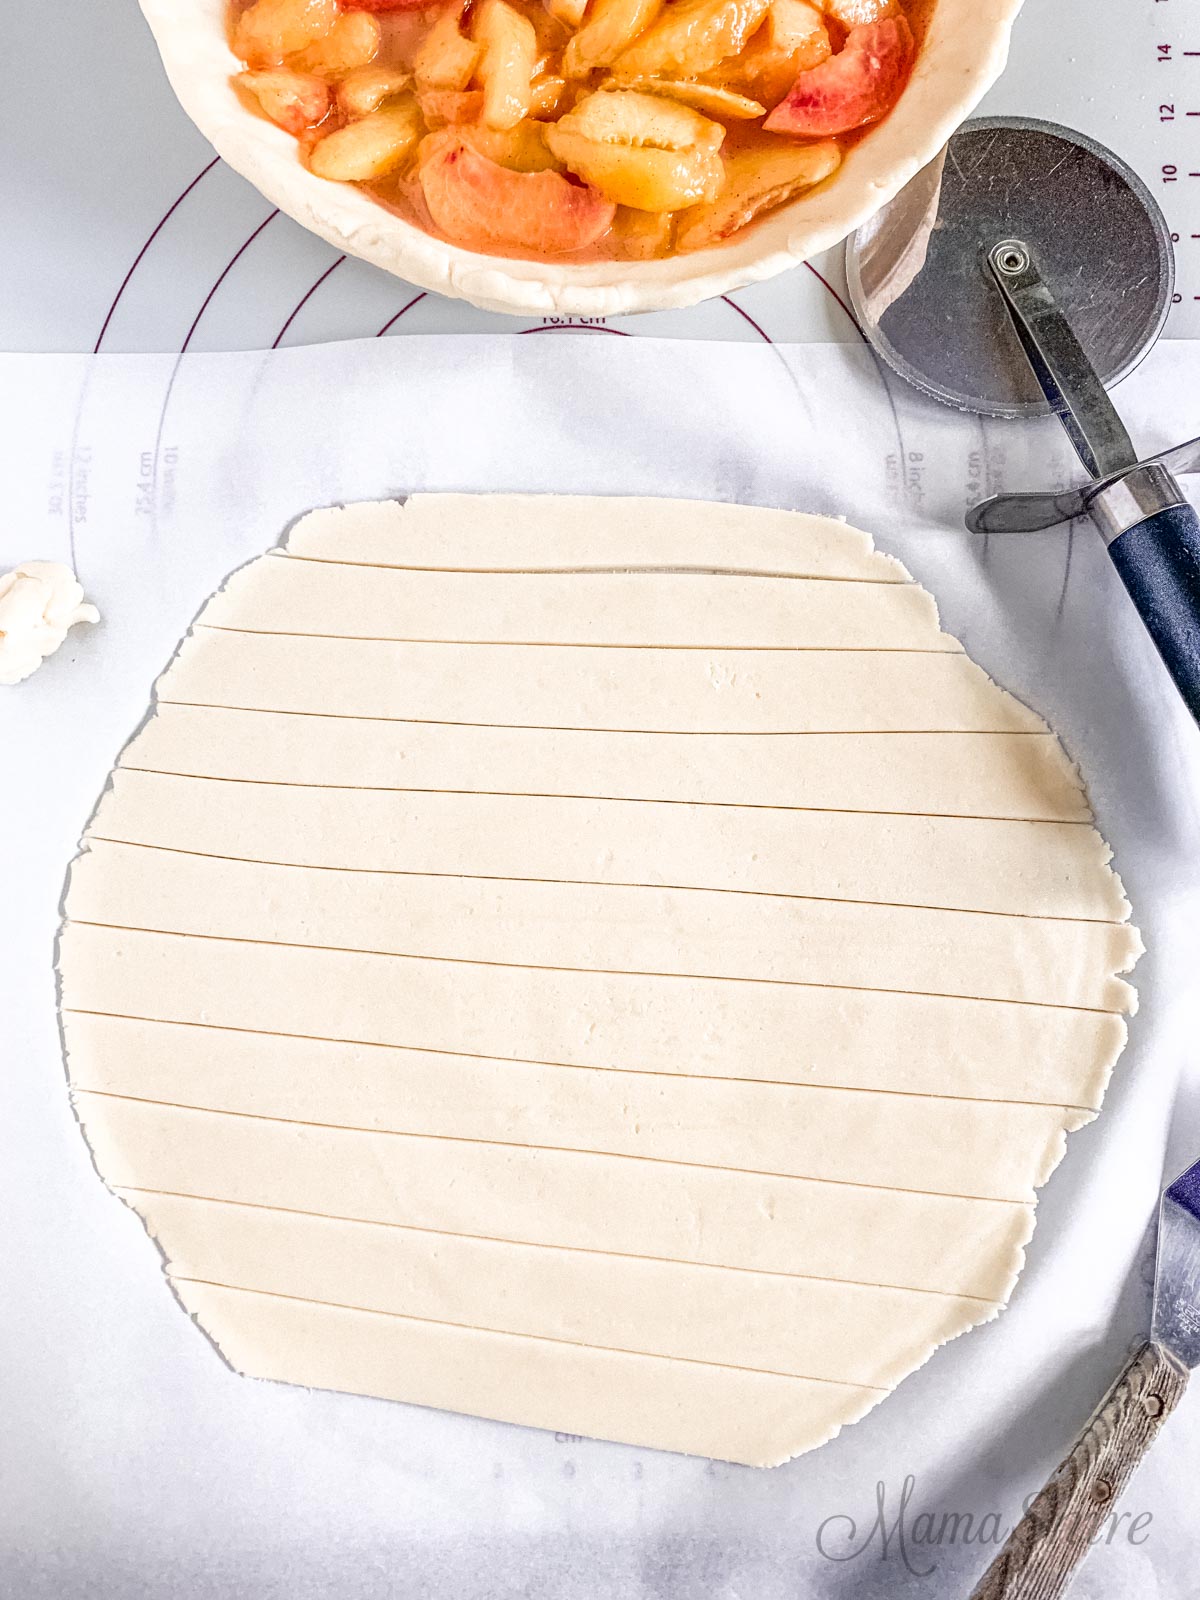
Making a Lattice Design Pie Crust
If you want to do a lattice design, use a pizza cutter or decorative pastry cutter to cut the dough into strips.
Place the strips across the pie like a basket weave. If the strips tear, the dough is very easy to pinch back together. Seal the edges of the pie crust and decorate the edge using your fingers or press a fork along the top edge.
Ingredients
- Gluten-Free Flour: My favorite gluten-free & dairy-free flour blends to use are Better Batter and Pamela’s Artisan Blend. I’ve been using them both with great results. They are both a 1-1 substitute. If you use another gluten-free flour blend, be sure that it contains xanthan gum. If it doesn’t have it, add 1/2 teaspoon of xanthan gum per cup of gluten-free flour.
- Dairy-Free Butter: Suggested brands are Country Crock Plant Based with Avocado Oil, Smart Balance, or Earth Balance.
Tools used
- Food Processor: This is my favorite food processor.
- Pastry Mat: I have a pastry mat from Pampered Chef that I’ve used for years. This one looks very similar.
- Pastry Cutter: This is a handy tool to have; not only can you make pie dough with it, but it also helps in making a streusel topping, and it cuts up avocado easily for guacamole.
- Decorative Pastry Cutter: This little tool can make your lattice strips look extra fancy.
More gluten-free pie recipes


Easy Gluten-Free Pie Crust
- Yield: 1 pie crust 1x
- Category: Desserts
- Diet: Gluten Free
Description
This gluten-free pie crust recipe is easy to make and roll out. It turns out so tasty and flaky. This makes the perfect crust for dessert pies and savory pies
Ingredients
- ½ cup dairy-free butter, chopped and frozen for 30 minutes
- 1 ¼ cup gluten-free flour mix
- ½ teaspoon salt
- 2 tablespoons of ice water
Instructions
Making the pie dough
Take the dairy-free butter and spread it out in small chunks on a freezer-safe plate. Then, place it in the freezer for 30 minutes.
In a food processor, put in the gluten-free flour, frozen dairy-free butter chunks, and salt and pulse until crumbly. Mix in one tablespoon of ice water (water only) and pulse. Add one more tablespoon of ice water and pulse until it forms into a ball.
If you don’t have a food processor, use two forks or a pastry cutter to cut in the dairy-free butter into the flour and salt. Cut in until crumbly. Mix in one tablespoon of ice water and mix. Add a second tablespoon of ice water and mix until it forms a ball.
Rolling it out
Take the ball of pie dough and any stray pieces of dough and place them on a piece of parchment paper that is on top of a pastry mat. Pat out into a round patty.
Place another piece of parchment paper over the pie dough and use a rolling pin to roll out to the pie crust to the size you need. Roll away from the center in different directions to evenly spread it out into a circle. Grab the parchment paper on the corners and turn the whole pie dough and both parchment papers over several times while rolling out.
Tip for using a pastry mat:
Using a pastry mat is really helpful in that it shows the measurements of the pie pan so that you know how big to roll it. If you don’t have something like that, turn your pie pan over on top to see how big you need it to be. You’ll want it a little larger than your pie pan.
And even though I use a pastry mat, I still put parchment paper down. Gluten-free pie dough is a bit stickier and more fragile than regular pie dough. Another great thing about the pastry mat is that it keeps the parchment paper from slipping, so it makes it easier to roll the dough out.
Putting the dough into the pie pan
Carefully pull off the top parchment paper, and then, holding the bottom layer of parchment paper, turn your pie crust over onto your pie pan and then slowly let it form to the inside of your pie pan.
Remove the parchment paper slowly. You may need to tear it in strips to get it off. Repair any tears that might happen by pushing the dough together with your fingers and then gently smooth out.
Trim the dough around the top edge of the pie pan to about a 1/2″ past the rim. Save any pieces that you trim off in case you need to repair any areas. Use your fingers to press a decorative design around the edge of the crust, or use a fork to press a design along the edge.
Now that you have it in the pie pan and the edge has been decorated, put it in the refrigerator for 30 minutes to chill. After it’s chilled, take it out, fill it with your pie filling, and bake it according to directions. I find that it bakes best on the lowest oven rack.
Make The Top Crust
Make the second pie crust. Roll out the second pie crust the same as before.
Place on top of the pie and cut off excess about an inch away from the edge, then fold over the edge of the bottom crust’s edge and seal, then crimp. Cut a few slits in the top crust to allow the steam to escape.
Making a Lattice Design
If you want to do a lattice design, use a pizza cutter or decorative pastry cutter to cut the dough into strips.
Place the strips across the pie like a basket weave. If the strips tear, the dough is very easy to pinch back together. Seal the edges of the pie crust and decorate the edge using your fingers or use a fork along the top edge.
Bake according to your pie recipe.
Notes
Gluten-Free Flour: My favorite gluten-free & dairy-free flour blends to use are Better Batter and Pamela’s Artisan Blend. I’ve been using them both with great results. They are both a 1-1 substitute. If you use another gluten-free flour blend, be sure that it contains xanthan gum. If it doesn’t have it, add 1/2 teaspoon of xanthan gum per cup of gluten-free flour.
Dairy-Free Butter: Suggested brands are Country Crock Plant Based with Avocado Oil, Smart Balance, or Earth Balance.
You may also enjoy


Becca
How do I bake this?
Most recipes call for baking a pie for 50 minutes will this pie withstand that amount of baking time?
Thank you!
MamaShire
Bake it for the amount your recipe calls for. It will hold up great. If you notice any browning on the edges rotate your pie. And I like to bake my pies on the lowest or next to lowest racks in the oven. That way the crust will bake up nicely.
Sarah
Can you make this a couple of day ahead?
MamaShire
This could be made a couple of days ahead formed in your pie pan, covered, and refrigerated.
Lucie Bowen
I would like to avoid going to the store again, can I use either real butter or vegetable shortening in place of the buttery spread?
If so, can I still use 1/2 a cup?
MamaShire
Yes, you can use real butter in place of the buttery spread! And use the same amounts.
Cathryn
Is the measurements in this recipe for both top and bottom crusts or for one only and we double it to make both?
MamaShire
The measurements are for one crust. If you want a double-crust pie make the recipe twice. (don’t double it)
Bonnie hunter
How can I get the pastry to not stick so much to the parchment paper . I made two small chicken pot pies and they were very hard to get into the pie dishes.please help
MamaShire
You may need to tear the parchment away in strips. That is what I do.
Rachel
Can this be left in the fridge longer than 30 minutes? For example, could I made and form the dough and leave it in the fridge overnight so long as it’s covered with plastic wrap?
MamaShire
Yes, once it’s shaped in the pan storing it covered overnight would be fine.
Jeanie
Hi can I use Almond meal flour for crust? can I use Olive oil or Vegetable oil instead of earth or Balance butter? I want to use up what I have. If I did use the oils would the measurements be the same? Thanks
MamaShire
I haven’t used those in this recipe so I couldn’t say. You could try this recipe at Paleo Running Mama. https://www.paleorunningmomma.com/paleo-pie-crust-grain-free-dairy-free/
Dee
Could I use sprouted whole wheat flour instead of the sprouted blend? Or perhaps oatmeal flour? Gluten is not a problem but do want to keep it an E.
MamaShire
You could definitely try it.
Christina
This is absolutely amazing. I use your crust too! I want to clarify a question asked above. Can I fully assemble this and leave in fridge for 2-3 days before baking? Or better to store filling separate and assemble just before baking? Thanks.
Making again this evening!
MamaShire
I think storing the filling separate would be best. I’m so glad you’re enjoying it!