These gluten-free sugar cookies are the stuff of cookie dreams. They have a rich buttery and vanilla flavor and a soft, tender texture. They are so good! For another classic cookie, be sure to try my Gluten-Free No-Bake Cookies.

Want to save this recipe?
These are my family’s favorite sugar cookies ever! We’ve been making this recipe since my girls were little, and I’ve adjusted it to be gluten-free and dairy-free so we can enjoy them again. They’re the perfect Christmas cookies! Be sure to see my post on Favorite Christmas Cookies post for more recipes.
Jump to:
Ingredient notes
- Gluten-Free Flour: My favorite gluten-free & dairy-free flour blends to use are Pamela’s Artisan Blend and Better Batter. I’ve been using them both with great results. They are both a 1-1 substitute. If you use another gluten-free flour blend be sure that it contains xanthan gum. If not add 1/2 teaspoon of xanthan gum per cup of flour.
- Dairy-Free Butter: Country Crock Plant Butter with Avocado Oil, Smart Balance, Earth Balance, or your favorite brand. Sit it out on the countertop for about 10 minutes to allow it to soften to a cool room temperature. You can use regular softened butter if you don’t need it to be dairy-free.
- Vanilla: This recipe calls for 2 tablespoons of vanilla extract. It gives these cookies amazing flavor.
- Other ingredients needed: sugar, two eggs, baking soda, and salt.

Instructions
Step 1: Using a stand mixer, cream together the dairy-free butter and sugar. Mix for 2 minutes to get it really incorporated together.
Add in the eggs and vanilla and continue mixing until thoroughly combined. Scrape down the sides as needed.
Step 2: Whisk together the gluten-free flour, salt, and baking soda. Gradually mix into the wet ingredients.
Step 3: Divide the dough into two and place on two large pieces of plastic wrap. Pat into a large flat circle and cover with the plastic wrap. Chill in the refrigerator for 2-3 hours or overnight.
Step 4: After the dough is chilled remove one at a time from the fridge and set it out on the counter so that it’ll start to soften up. Preheat the oven to 350°. Line two baking pans with parchment paper or silicone baking mats.
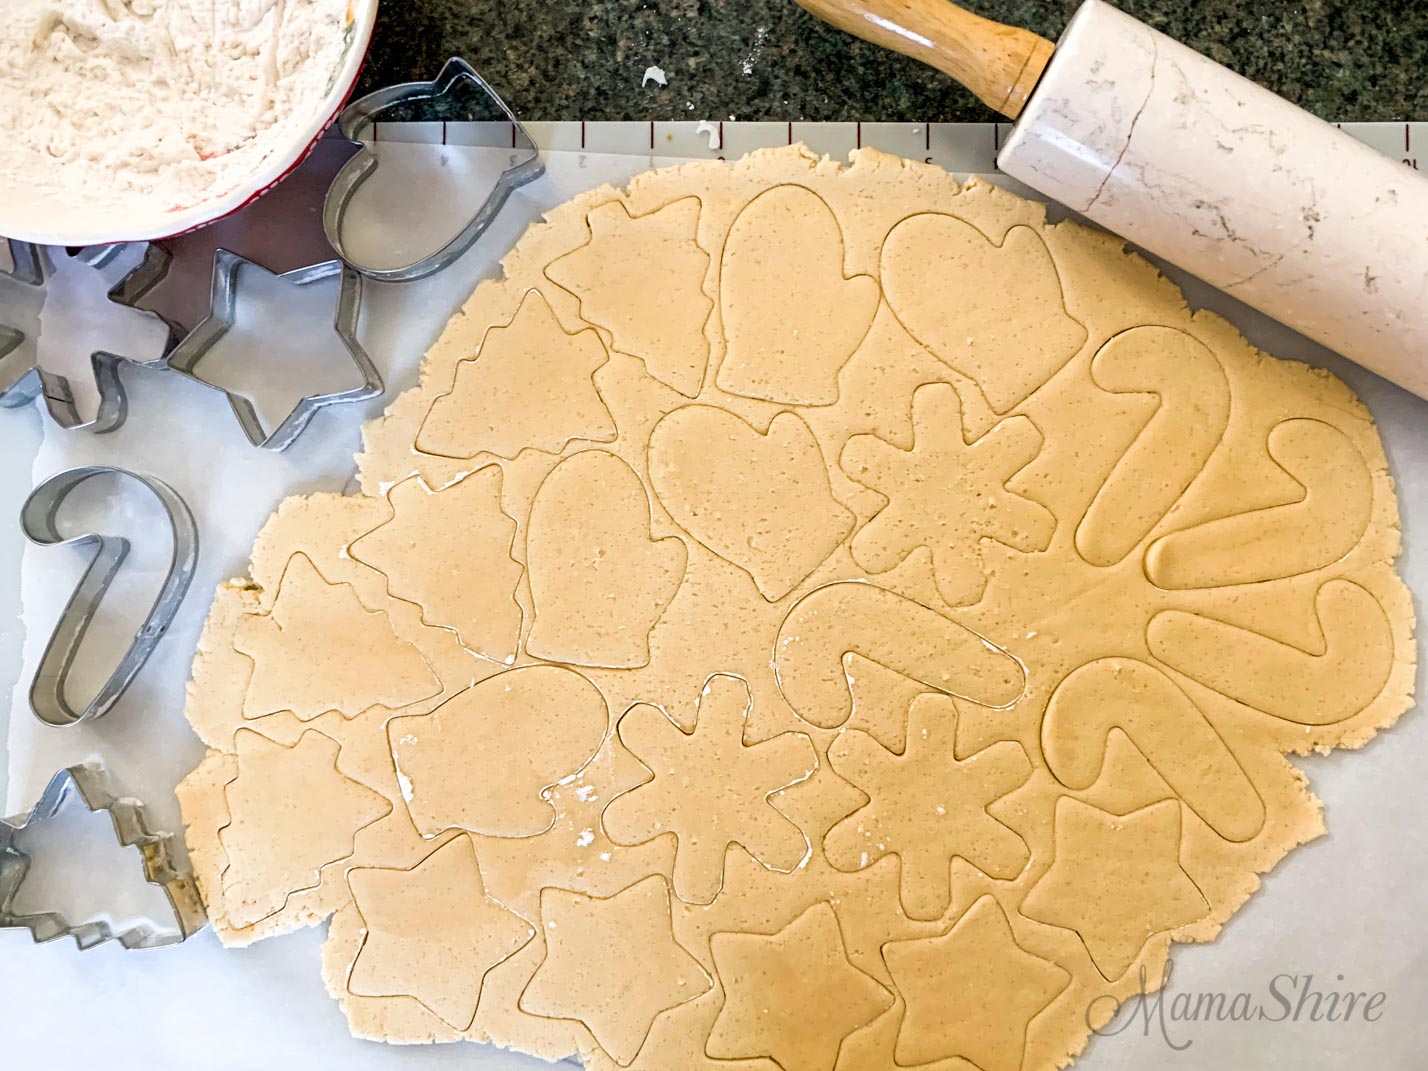
Step 5: Layer the cookie dough between two large pieces of parchment paper. Roll out the cookie dough to about 1/4 inch thick. Use cookie cutters to cut out cookies.

Step 6: Use a spatula dipped in flour to slide under the dough to move the cookies to the baking pan.
Note: If you’re having trouble moving the dough to the baking pan because it’s too soft or spreading then slide the entire rolled-out dough and the parchment paper onto a flat baking sheet that will fit in your refrigerator and chill for 10 to 15 minutes and then you should be able to move them much easier. You can also do this step if you want the baked cookies to have a more defined edge.

Step 7: Place cookies about 1/2 inch apart. Bake for 10 minutes. Cool on the baking pan for 5 minutes and then remove to a wire rack. Cool completely before adding any icing.
Make the icing:
Step 1: Mix together the confectioner’s sugar, softened buttery spread, vanilla, and almond or cashew milk until smooth. If you want to add food coloring, separate icing into small bowls and mix in a few drops of food coloring until you get the color the way you want it.
Step 2: Spread the icing on the cookies and then leave the cookies out in single layers for several hours to let the icing set.

Note about gluten-free dyes & sprinkles:
I tried out a couple of gluten-free options for the food coloring and the sprinkles.
- The Watkins Co. makes both dyes and sprinkles that are gluten-free. I was only able to find the food dye locally (it was with the spices, not the cake decorating supplies). The Watkins natural food dye produces more of a softer color palate and not the bright red or green that is common. Also, the price on Amazon is several dollars cheaper than what I was able to find locally. I haven’t tried Watkins Sprinkles yet.
- The decorating sprinkles that I used were from Ultimate Baker. Another great choice is Supernatural Christmas Softies Sprinkles and Trader Joe’s gluten-free sprinkles.

Tips for freezing and decorating:
Make-Ahead for Cooking Making Day: You can leave the wrapped dough in the refrigerator for 2-3 days. So, if you’re having a cooking day with friends or family, you can have the dough already made and chilled ahead of time.
Bake and Freeze: You can also bake and freeze the cookies so that the baking is done. Then, all that needs to be done is the decorating. This would be an easy way to add a cookie-decorating activity to your Christmas gatherings.
Decorate & Freeze: The decorated cookies could be frozen as well. Freeze in single layers for the best results, and then after they are frozen, you can repackage them with layers of parchment paper between the cookies. These can be frozen for 2-3 months.

More gluten-free cookies you’ll love:


Gluten-Free Sugar Cookies (Dairy-Free)
- Prep Time: 3 hours
- Cook Time: 10 minutes
- Total Time: 3 hours 10 minutes
- Yield: 5 dozen 1x
- Category: Desserts
- Method: Baking
- Diet: Gluten Free
Description
These gluten-free sugar cookies are so delicious with their rich vanilla flavor. Perfect cut-out cookies for Christmas!
Ingredients
- 1 ½ cup dairy-free butter, softened to cool room temperature
- 1 ½ cup sugar
- 2 eggs, room temperature
- 2 tablespoons vanilla
- 4 cups gluten-free flour blend**
- 1 teaspoon salt
- 1 teaspoon baking soda
Icing Ingredients:
- 1 ½ cups confectioner’s sugar
- 3 tablespoons buttery spread, room temperature (Smart Balance or Earth Balance)
- 1 tablespoon vanilla extract
- 1–2 tablespoons almond or cashew milk
Instructions
- Using a stand mixer cream together the buttery spread and sugar. Mix for 2 minutes.
Add in the eggs and vanilla and continue mixing until thoroughly combined. Scraping down the sides as needed. - Whisk together the gluten-free flour, salt, and baking soda. Gradually mix into the wet ingredients.
- Divide the dough into two and place on two large pieces of plastic wrap. Pat into a large flat circle and cover with the plastic wrap. Chill in the refrigerator for 2-3 hours or overnight.
- When completely chilled, preheat oven to 350°. Line baking pans with parchment paper or use silicone baking mats.
- Place cookie dough between two sheets of parchment paper and roll out to 1/4 inch thickeness. Cut out with cookie cutters and place on baking sheets.
- Bake for 10 minutes. Cool on the baking pan for 5 minutes and then remove to a wire rack. Cool completely before adding any icing.
Icing Instructions:
- Mix together the confectioner’s sugar, softened buttery spread, vanilla, and almond or cashew milk until smooth. If you want to add food coloring, separate the icing into small bowls and mix in a few drops of food coloring until you get the color the way you want it. (See my notes in the post about gluten-free food coloring and dyes)
- Spread the icing on the cookies and then leave the cookies out in single layers for several hours to let the icing set.
Notes
Note: If you’re having trouble moving the dough to the baking pan because it’s too soft or spreading, then slide the entire rolled-out dough and the parchment paper onto a flat baking sheet that will fit in your refrigerator and chill for 10 to 15 minutes and then you should be able to move them much easier. You can also do this step if you want the baked cookies to have a more defined edge.
Tips for Freezing & Decorating:
Leave the wrapped dough in the refrigerator for 2-3 days. So if you are having a cooking day with friends or family, you can have the dough already made and chilled ahead of time.
Freezing: Also, you can bake the cookies and freeze them so that the baking is done as well so then all that needs to be done is the decorating. This would be an easy way to add a cookie-decorating activity to your Christmas gatherings.
The decorated cookies could be frozen as well. Freeze in single layers for the best results, and then after they are frozen, you can repackage them with layers of parchment paper between the cookies. These can be frozen for 2-3 months.
*You can use real butter if you don’t need these to be dairy-free.
**My favorite gluten-free & dairy-free flour blends to use are Pamela’s Artisan Blend and Better Batter. I’ve been using them both with great results. They are both a 1-1 substitute. If you use another gluten-free flour blend be sure that it contains xanthan gum. If not add 1/2 teaspoon xanthan gum per cup of flour.
You may also enjoy


Cora